E-Design Floor Plan & Ensuite: Century Home Renovation

floor plan: reconfiguring THE SECOND FLOOR

I first began working on the redesign of this century home for an e-design client a few years ago, beginning with designing a new open concept main floor kitchen. The homeowners are a young active family of 3 with a big picture goal of a whole home renovation and are approaching the re-design of the home with a lot of preparation, initially working with an architect to draft up floor plans to reflect their general wish list. From there, they reached out to me to review and assess their proposed plans and develop the interior design further. With the new plan for the main floor now detailed to completion, we recently took on the task of assessing the second floor.

Here’s a look at the existing floor plan, along with the initial concept they had drawn up for the second floor reno. The current layout is 2 + bedroom and 1 bath, the “+ bedroom” being an oddly small room originally referred to as a ‘carriage room’ in the old days. They’re awkwardly too small to use for a bedroom (and don’t meet minimum code dimensions for a bedroom) and not quite large enough to function as much else other than a tiny office or storage. You’ll notice that even in the client’s proposed plan the room hadn’t been utilized for a new purpose. (note the secondary back staircase was already planned to be removed for the main floor kitchen reno.)

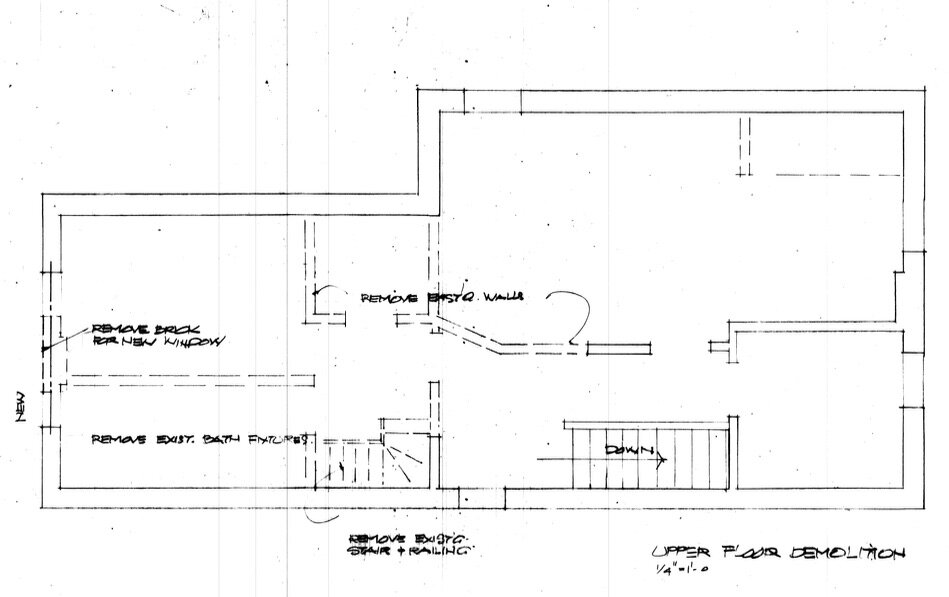
When I assessed their plans I saw some missed opportunity to add more value to their reno investment - the small carriage room wasn’t being utilized for a new purpose and I saw this a valuable space. I can appreciate the desire to maintain the feature of a 3rd bedroom but this space wasn’t functional for that by modern day standards and by maintaining it, it was preventing them from adding more functional upgrades like a second bathroom and bigger closets. Typically the incentive for renovating these homes is to increase the number of bathrooms and closets where ever possible.

What I liked about their plan was the large master bedroom at the back of the house, and its walk-in closet, but what was lacking by today’s standards for a newly built or renovated home was a master ensuite, although I could see there was definitely potential to add one. My viewpoint on this was that I didn’t see any added value in keeping the tiny carriage room, but if they could create an ensuite in addition to the main hall bathroom and a larger second bedroom they’d not only be adding value and function but greatly enhancing their day to day enjoyment of their rooms.

CarolReedDesign-EDesign-FloorPlan-Option.jpg

I immediately explored the potential to add that ensuite to the master. Above is a quick block plan of just one way that could be possible . Although this was perhaps the most straightforward approach from a layout perspective, we didn’t develop this any further, instead we opted for a more efficient approach of keeping the two bathrooms back to back (which would also stack them above the power room below.)

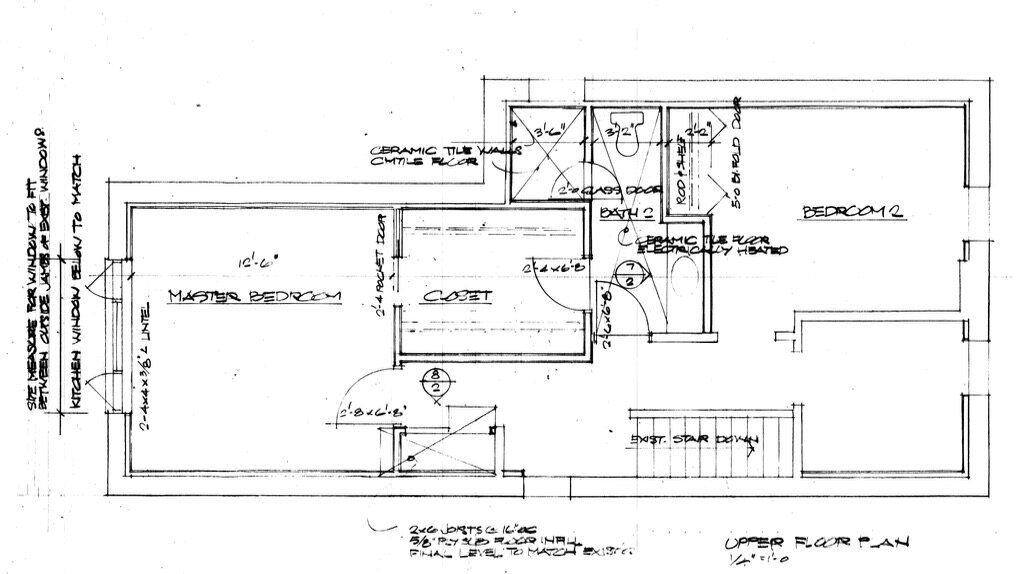
Below is a look at the final before and after plan for the second floor.

CarolReedDesign-EDesign-CenturyHome-FloorPlan-BeforeandAfter.png

The new plan keeps the master bedroom at the front of the house where it currently is (not shown on plan the intent is for the window to be enlarged to match a new larger window on the main floor below) and it enjoys a 4 piece ensuite and separate walk-in closet. Their son now gets a more spacious bedroom, for a queen or twin beds along with a full wall of buitin storage. The hall bath is compact but doesn’t lack anything, it has a 36” vanity and full size tub/shower combo. The hallway is nicely proportioned and is spacious enough to accommodate some furniture pieces which is a wonderful bonus that always makes a hallway live larger than it is.

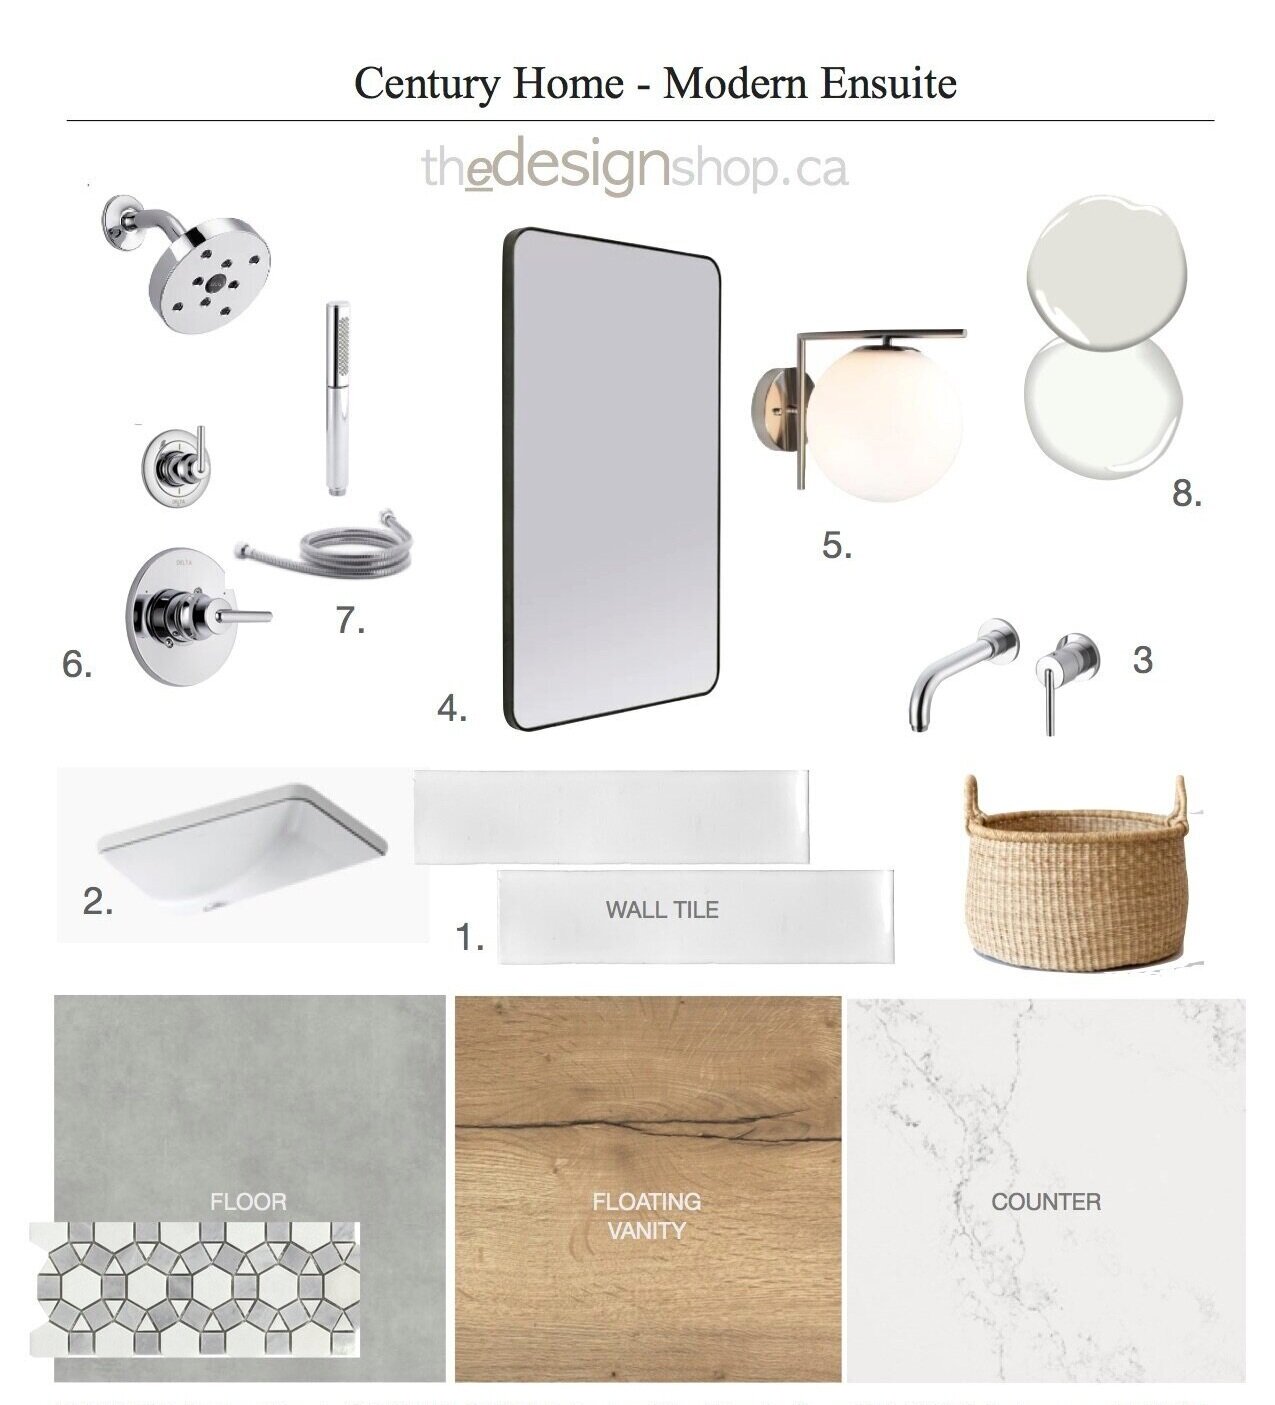
Now that the floor plan was finalized we moved on to designing the master ensuite. Here’s a look at some of the inspiration images my client had collected on Pinterest which provides some insight to her style objectives.

CarolReedDesign-EDesign-CenturyHomeReno-Inspiration.png

Inspiration images are quite different than mood boards which are typically more abstract in imagery. The method of curating room images is incredibly helpful for e-design clients to communicate to me what they like in terms of style, colour palette, and architectural features. From these I can comprehend their design language and spot consistencies in what they’re drawn to. In this case, it was simple, clean lines, modern, white, light natural wood tones, touches of black and a hint of mid-century modern. A floating, double vanity was top of her wish list.

CarolReedDesign-EDesign-CenturyHomeRenovation-Ensuite-Elevation.jpg

This is one option we presented for the vanity, designed to float on a wall of warm-white glazed tiles that add a distinct texture. The floating vanity was configured using standard Ikea Sektion sizes +/-” so this would give them the flexibility of having it either fully custom made or going with an off the shelf solution and adding custom drawer fronts only in a light wood tone with shelves to match.

Material Samples for Master Ensuite | Carol Reed Interior Design Inc.

Material Samples for Master Ensuite | Carol Reed Interior Design Inc.

Sample materials for the ensuite design included a mix of glazed wall tile, large format porcelain floor tile, white and grey marble slabs, and a grey and white geometric marble mosaic in the shower.

CarolReedDesign-EDesign-CenturyHomeRenovation-EnsuiteConcept.jpg

There’s always a unique solution for every space as each homeowner’s requirements are different. The concept above is a preliminary version of the final concept that was delivered to our client.

One of my key pieces of advice for bathroom reno’s, particularly if you’re not working with a designer, is to avoid trendy tiles, or attempting to create a complex tile scheme - use restraint, stick with finishes in timeless neutral palettes, use natural materials (or their man-made look-a-likes) that have interesting textures and classic patterns installed with consideration as to how each enhances and elevates the other. There’s plenty of space to inject your personality into the room with light fixtures, artwork and accessories, these can be changed up anytime without demolition.

If you need help with a challenging floor plan, check our E-Design services on thedesignshop.ca

For more peeks at full-service and e-service design projects you can follow us on Instagram @carolreeddesign

CREED Blog: The Subscriber Edition

CREED For Your Home 1.png

March of 2020 marked the 15th anniversary of CRID and in the spirit of evolving on the Blog I had planned to launch our first subscriber’s “Newsletter”, (which is actually not intended to be a Newsletter style at all). Instead, I consider it a Subscriber’s Edition of the CREED Blog delivered to your inbox. It won’t contain the blog post themselves but rather a letter of highlights with some personal insights and shares (beyond the blog post topics) that I hope you’ll find particularly useful for your own home projects. Which is why I’ve named this Subscriber Edition of the Blog, For Your Home.

On the website and the sidebar of this blog there’s a Subscriber sign-up form which was added about 5 months ago when I first began setting up the tech side of things. To all those who have subscribed - thank you for your patience!! My plans to launch to the Subscriber’s list in March were interrupted when all COVID sh*t hit the fan and normal daily life came to a halt. Our work schedule went a bit sideways as projects accelerated to adjust for potential shut-downs so logistically I opted to postpone the launch til things normalized somewhat. Juust when it looked like that was happening the tragic death of George Floyd turned our collective attention to much larger, more important issues, and that’s where it needed to be.

This year more than ever I’ve been craving a space where I can share resourceful info for home improvements while knowing its reaching those who are interested and want to receive it, (without any algorithms to contend with) and allowing me to tailor topics specifically to your interests. For me that space has always been blogging and email. My own domain is my on-line home and where I feel most inspired to post, its where its most relevant and where I’m returning my focus.

Now here we are post Canada Day and well into July so I’ve decided I’m just going to jump right in and get this Subscriber’s Edition launched this week because I feel more ready for it now than ever, especially after these past 4 months.

I’m not sure exactly what format this new edition will take on but I have lots of ideas I want to explore. There’ll be an Ask A Designer section where you can send me a question and I’ll share at least one Q&A in each edition - so get your questions ready!! I’ll include round-ups of some favourite (and affordable!) finds and go-to’s. The content will develop organically as I get in the groove and get your feedback.

I can’t promise how often you’ll receive updates in your inbox, at least once a month as a start, ultimately bi-monthly. What I can promise is there will be no ads or sponsored content in the emails and no obligation to ‘like’ or comment (for the algorithm) - but I do hope you’ll feel encouraged to comment directly via email or in the Blog comment section.

If you’ve received this blog post in your inbox it’s because as a current or past client, associate, friend or family member you’re automatically subscribed to receive the first and future Subscriber Editions from the blog. Coming soon! If you want to unsubscribe you can easily do that at the bottom of this post or the news letter at any time. The Blog will still remain right here on the website for anyone to visit.

If you’re reading this blog post on the website and haven’t yet subscribed, you can do that right here, by just entering your email. that’s it!

SIGN-UP USING THE FORM IN THE SIDE BAR OF THIS POST

OR

AT THE BOTTOM OF THE PAGE.

I’ll be sending the first subscriber’s letter out THIS WEEK and look forward to hearing what you think of it, you can comment directly to me by just hitting reply to send me an email, I’ll personally receive and read each one.

Carol-Signature-Small.png

Our East Coast Barn Makeover & Potager Garden: Part 2

After building the raised beds and installing the picket fence the potager garden instantly had a distinct purpose and was a new favourite place to spend time. The barn is an integral part of the garden not only is it the backdrop to the garden but its where we prep all our seeds and keep all our gardening stuff.

Carol Reed Design - Barn and Picket Fence.JPG

The main floor of the barn is divided into two areas, the back area with the big double doors is a workshop area, the opposite end is a lounge/bunkie area, with doors that open up out towards the house and ocean. In the warmer months this lounge area functions as a screen porch and bunkie.

Carol Reed Design - Potager Garden - SquareFootGardening.jpg

We had little to no experience with gardening before we built these raised beds in 2016 and when it came to figuring out what to plant in them I relied on some basic research and opted to go with the square foot gardening method because it made 2 things super easy for us, it clearly allowed us to see how many plants we needed because the number of plants per square is determined for you, (its easy to overlook how big you plants will be at maturity so the grids allow you to easily visualize that mature size) and you can plant in very neatly organized rows, sections or pattern of your choice. As a spacial designer it was super helpful for me to visualize colour planning the plantings and also for creating symmetry in the 8 beds. I was attempting to create a combined ornamental and vegetable garden (potager) and incorporating perennial shrubs too so planning all this from scratch using a square foot grid simplified and organized the process for me.

Carol Reed Design - Potager Garden - Planting Plan.jpg

During the winter before our first plantings I prepared a planting plan for each bed, you can see a glimpse of in the image above. I allotted categories to each of the 8 beds, 2 herb gardens, 2 lettuce gardens, 2 veg gardens and 2 cutting flowers. Mixed into each would be some annual flowers and perennial shrubs. Initially I started out creating a geometric pattern in each bed, ie; a globe boxwood in the middle, chives in each corner, a border of maigolds etc…Each bed had a different pattern. Adding to the puzzle was that I also had to ensure the plantings were compatible with each other and received the proper amount of sunlight. The best laid plans however can often unravel! After our first trips to the garden centres we quickly realized we weren’t going to be to able to follow our plans so strictly because the selections were limited particularly for certain flowers and certain colours. The plans were incredibly useful to have on hand as we knew exactly what to look for, but we also made it easy to make a lot of substitutions on the fly.

CarolReedDesign-Potager-Garden-After-Obelisks.jpg

I think this photo above was from the second summer. The original planting plan was modified from what we learned after the first season - basically, nothing that needs hot temperatures and a lot of sun did well in our garden (peppers, rosemary, basil, beans, garlic..…) essentially for season two our plan became to just buy as much of whatever plants we had success with and could find locally and figure out where to put them once we got home.

Carol Reed Design - Barn Exterior  with Climbing Vine.JPG

Early fall in the garden as things were dying off. ….fall has become one of the prettiest times in the garden, I buy loads of potted mums and pumpkins of all sizes to fill in all the bare spots (more pictures of that in the fall). It extends the life of the past-its-peak garden creating a totally autumnal vibe and when all the cabbages and ornamental kale really get to show off.

Carol Reed Design - Barn Shed Interior.jpg

The original barn was a workshop to a carpenter who also made lobster traps and there used to be a public fishing wharf on the shore behind our property. There were a few old bouys in the barn and we’ve inherited a lot of mariner kitsch from a neighbour who’s a fisherman so the interior style has organically evolved into part fish shack part garden shed. Aside from paint the barn is in its original condition including original windows, for now we’ve simply painted all the interior walls white and the floor a blue/grey and built a new wall to enclose the work shop and also the staircase.

Carol Reed Design - Barn Shed Interior with Golden Rod.JPG

I designed a pair of day beds to fit XL twin mattresses, they function as sofas and extra guest beds during the summer early fall. Used separately as adult twins, pushed together they create a king sized bed. The coffee table was made from reclaimed wood from our house reno and an old beam we found washed up on the beach

Carol Reed Design - Barn Shed Interior TeaTime.JPG

In the spring and early summer we keep our transplants inside the barn until the weather’s warmer and we also start some seedlings in the workshop. This pic is from last year shortly after returning from London (with a huge supply of tea!), the long weekend in May was so cold and wet I spent a lot of time in the barn enjoying hot tea and planning out the raised beds. A shiplap wall encloses the staircase to the upper level.

Carol Reed Design - Barn Shed Interior with Straw Hats.jpg

A vintage mariner painting found locally, and an antique cedar chest that was my grandparents, from my childhood bedroom.

Carol Reed Design - Barn Shed Interior Tea and Pastry.JPG

I had recently returned from England where I became addicted to cream tea, a tradtional afternoon tea served with scones, clotted cream and jam. I brought loads of tea home with me and so I continued the afternoon habit with whatever pastry or sweets i could find and until all my wonderful tea’s ran out. On this day we had no scones or baked goods in the house so I whipped up these treats in literally a few minutes using thawed frozen puff pastry sheets, some banana slices and chocolate chunks - baked until golden and gooey. Hot tea and baked sweets in the barn made a rainy long weekend not so bad.

This year will be our fourth season planting the beds and we now rely on some tried and true, no fail favourites. These are the plants that pop up in early spring even if there’s snow or frost, or are still thriving long past thanksgiving - they are maintenance free, and produce such great tasting food that they’re total winners for us in a very challenging environment.

MY POTAGER GARDEN FAVOURITES:

THESE SIX NO-FAIL PLANTS WILL LOOK BOUNTIFUL, TASTE DELICIOUS AND THRIVE IN EARLY SEASON COOL TEMPS

We have cold wet springs here on the coast and being right on the shore our garden is exposed to lots of fog, salt mist, rain, and high winds but none of that seems to have any negative effect on these plants. What I love even more about these is that they’ll fill your garden with fresh green and purple during those times of the year when your garden might look pretty bare.

The spinach transplant likes the cold, and grows fast, we’ve been eating baby spinach salads almost daily (in June), which is a treat when not much else in your garden is growing yet, except chives! Chives are champs! We planted these perennials the first year, even in snow they’re bursting out of the ground in this beautiful spray of vibrant green and by early June the purple flowers are out.. Oregano is another perennial, they spread a lot and have grown into this beautiful tall mass of herby green leaves. Since we can’t grown basil, we use oregano they way we would normally use basil - in everything. The sugar snap peas were the sweetest surprise, we planted these for the first time last year and to our surprise these sprouted out of the ground this year along with the chives. Some fallen seeds from last year just germinated on their own and now there’s a entire crop of them growing like crazy, they are hands down one of the most delicious things we grow, and beautiful climbers. Cabbages are my go to. I plant dozens of these, purple and white. They’re gorgeous, huge, and add so much texture and colour to the garden right through to end of October. They store well, and we love cooking with cabbage so its win win win. Terragon,,,not my favourite herb to eat but I love the plant because it reminds me of rosemary (which we can’t grow) its a perennial that just keeps coming back bigger and bigger each year. It pops up in very early spring and like the chives, its a welcome burst of green in the garden when nothing else has been planted yet.

Carol Reed Design - Potager Garden Chive Harvest.jpg

Arm loads of chives, the first of three harvests. We cut them down to a few inches of the soil three times a season, they grow right back to full height in less than 2 weeks. A never ending supply (more than we can possibly eat), we put chives on everything now.

Carol Reed Design - Kitchen Farm Sink with Chive Alliums.jpg

I love this plant as much for the flowers it produces.

If you’re not yet growing any veg or herbs at home I highly recommend starting some, nothing tastes better than growing your own, and they look beautiful too!. As newbie gardeners we get overly excited at the smallest successes because we’ve had so many failures but we keep on experimenting and discovering new things that work and what doesn’t, I hope our list of easy to grow plants grows longer every year.